HOW TO MAKE CLEANER FLOWERS BOUQUET
There’s something deeply satisfying about turning a few simple supplies into something beautiful. Pipe cleaner flowers are one of those crafts that are easy to make, have a lovely appearance, and don’t require any special skills. This small project brings great joy with little effort, whether you’re decorating your space, making handmade gifts, or simply seeking a creative break.
What’s the best? You don’t need expensive tools or artistic talent. If you can twist and bend a pipe cleaner, you can make a flower.
In this step‑by‑step guide, I’ll walk you through exactly how to create pipe cleaner flowers, share styling ideas, and give you practical tips to make yours look neat and professional.
Why Pipe Cleaner Flowers Are Worth Making
Pipe cleaners appear to be basic craft supplies for children at first glance. But once you start shaping them into flowers, you’ll realize how versatile they are.
Here’s why people love them:
- They’re affordable and easy to find
- They last forever (no wilting or watering)
- They’re safe for kids and beginners
- They’re fully customizable in color and size
- They make thoughtful handmade gifts
- They’re perfect for décor, photos, and DIY content
You can create a single flower in five minutes or spend an afternoon building a full bouquet. In either case, the outcome is always happy.
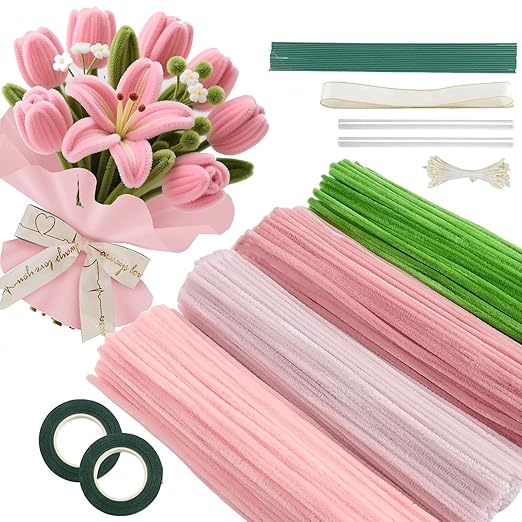
Materials You’ll Need
Before you begin, gather these simple supplies:
- 2–4 pipe cleaners for petals (any color)
- 1 green pipe cleaner for the stem
- Scissors
- A pencil or your finger (for shaping loops)
- Optional: green floral tape or glue
That’s it. No glue guns, no fancy equipment.
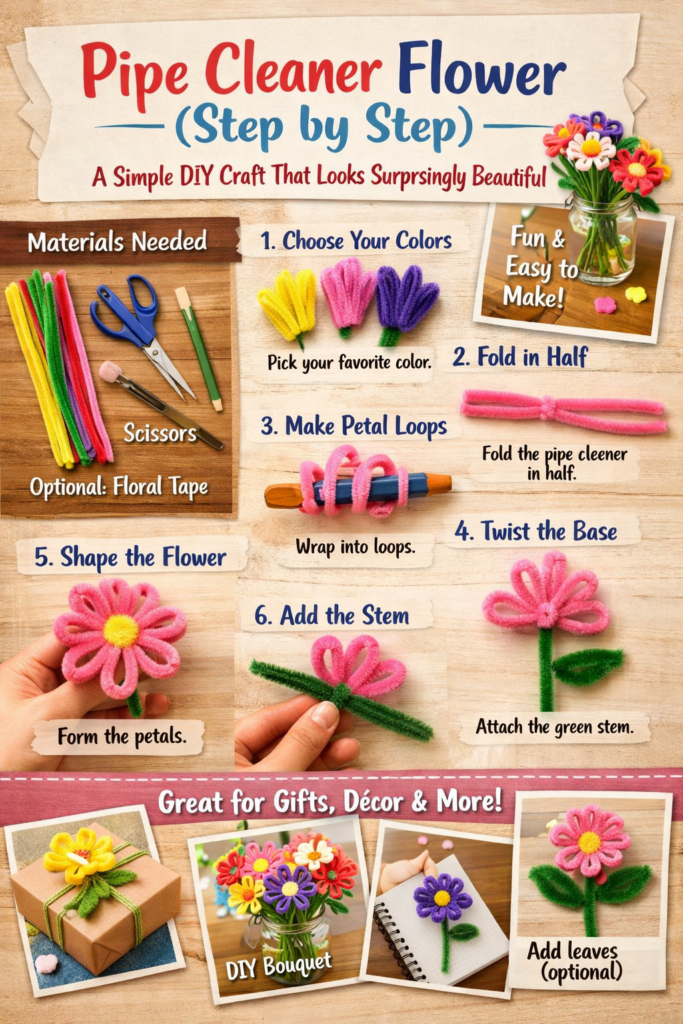
Pipe Cleaner Flower: Step‑by‑Step Tutorial
Let’s get into the fun part.
Step 1: Choose Your Color Combination
Decide what kind of flower you want to create. Vibrant hues like purple, pink, or yellow have a bold, playful vibe. Pastels give a softer, aesthetic look. White with a yellow center works perfectly for daisies.
Pick one main color for the petals and green for the stem.
Step 2: Fold the Pipe Cleaner in Half
Fold a single pipe cleaner evenly in the center. This keeps your flower symmetrical and in balance.
If you want a fuller flower, you can fold two pipe cleaners together.
Step 3: Create the Petal Loops
Wrap the folded pipe cleaner around your finger or a pencil to create small loops. Each loop becomes a petal.
Aim for about 5–7 loops depending on how full you want your flower to look.
If they’re not flawless, don’t worry—small variations give the flower a more organic appearance.
Step 4: Twist the Base Securely
Once your loops are formed, twist the two loose ends together tightly at the bottom. This forms the base of the flower and keeps the petals in place.
Make sure it’s firm so your petals don’t loosen later.
Step 5: Shape the Flower
Gently spread the loops outward with your fingers. To create a round, well-balanced flower shape, adjust the size and spacing of each petal.
This step really brings the flower to life.
Step 6: Attach the Stem
Twist a green pipe cleaner around the flower’s base. After that, wrap it down to create the stem.
If you want it sturdier, wrap it twice around the base before twisting downward.
Step 7: Add Leaves (Optional but Pretty)
Cut another green pipe cleaner in half. Bend it into small leaf shapes and twist it onto the stem a few inches below the flower.
This tiny detail makes a big difference in how realistic your flower looks.
Popular Flower Styles You Can Try
Once you understand the basic technique, you can experiment with different designs:
Rose style – coil the pipe cleaner tightly in a spiral
Daisy – white petals with a yellow center
Tulip – oval-shaped folded petals
Sunflower – brown or black center with yellow loops
Mini flowers – use shorter pipe cleaners for tiny bouquets
Mixing styles in one vase creates a beautiful handmade arrangement.
Creative Ways to Use Pipe Cleaner Flowers
Your finished flowers don’t have to sit in a drawer. Here are fun ways to show them off:
- Desk or bedside table décor
- Room aesthetic styling
- Handmade gift bundles
- Wedding or party centerpieces
- Kids’ art projects
- Photo props for blogs and Pinterest
- DIY bouquets in mason jars
They’re lightweight, colorful, and instantly brighten any space.
Tips to Make Your Flowers Look Professional
If you want your flowers to look polished instead of messy, keep these tips in mind:
- Use thick, fluffy pipe cleaners
- Twist tightly at the base
- Combine two pipe cleaners for fuller petals
- Keep petal sizes similar
- Wrap stems neatly
- Store upright to avoid bending
A little attention to detail goes a long way.
Why This Craft Is Perfect for Beginners
Pipe cleaner flowers are one of the easiest DIY projects to start with because:
- There’s no wrong way to do it
- Mistakes are easy to fix
- Supplies are cheap
- The process is relaxing
- Results are immediate
It’s a great activity for kids, teens, adults, or anyone who wants to unplug and create something with their hands.
CONCLUSION
Pipe cleaner flowers prove that beautiful things don’t have to be complicated or expensive. You can make vibrant decorations that never fade and always make people smile with a few simple twists and bends.
This easy project is worthwhile whether you’re making gifts, decorating your house, crafting for pleasure, or producing content for your lifestyle blog.
Once you make one flower, you’ll probably want to make ten more.
If you enjoyed this tutorial, save it for later and share it with fellow DIY lovers who enjoy easy, creative projects.